آموزش
مثال ها |
اطلاعات پایه | فوت وفن
ها | پیوندها
Examples > Digital I/O
Debounce
این مثال شرح می دهد که چطور یک ورودی را --- (debounce) کنیم،
مفهوم Debounce این است که جهت حصول اطمینان از اینکه دکمه قطعاً فشرده شده است، ورودی
را در یک دوره زمانی کوتاه دو بار بررسی کنیم. بدون انجام عمل Debounce یک بار فشردن
کلید می تواند در کد به صورت چندبار فشردن تشخیص داده شود. از تابع millis() جهت رهگیری
زمان در موقعی که کلید فشرده شده است، استفاده می شود.
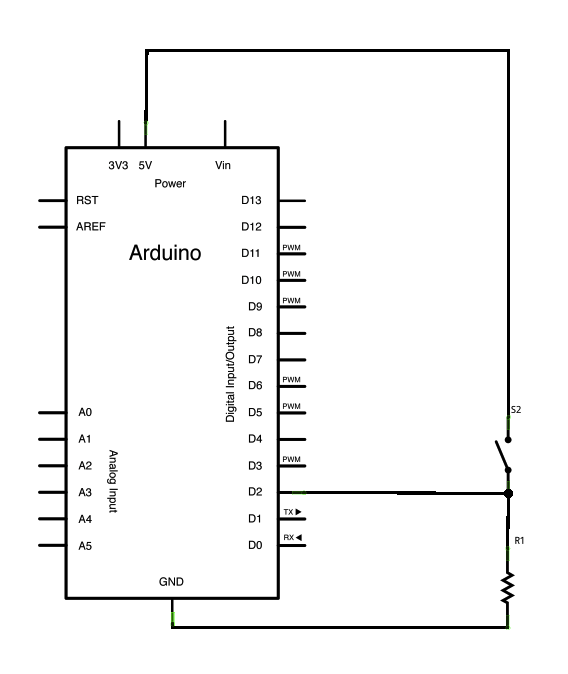
سخت افزار مورد نیاز
- برد آردوینو
- سوییچ یا کلید دو وضعیتی
- مقاومت 10 کیلو اهمی
- بردبورد
- سیم بردبوردی
مدار
این تصویر با استفاده از نرم افزار Fritzing ایجاد
شده است. برای مثال های بیشتر مدار به صفحه
پروژه های
Fritzing مراجعه نمایید.
شماتیک
برای بزرگ شدن تصویر روی آن کلیک کنید.
کد
کد زیر بر اساس
نسخه debounce خانم Limor Fried نوشته شده است، اما در واقع معکوس مثال او عمل
می کند. در مثال ایشان، سوییچ زمانی که بسته است LOW ، و زمانی که باز است HIGH را
بر می گرداند. اما در اینجا، زمانی که سوییچ فشرده شده است HIGH، و زمانی که فشرده
نشده است LOW را بر می گرداند.
/*
Debounce
Each time the input pin goes from LOW to HIGH (e.g. because of a push-button
press), the output pin is toggled from LOW to HIGH or HIGH to LOW. There's
a minimum delay between toggles to debounce the circuit (i.e. to ignore
noise).
The circuit:
* LED attached from pin 13 to ground
* pushbutton attached from pin 2 to +5V
* 10K resistor attached from pin 2 to ground
* Note: On most Arduino boards, there is already an LED on the board
connected to pin 13, so you don't need any extra components for this example.
created 21 November 2006
by David A. Mellis
modified 30 Aug 2011
by Limor Fried
modified 28 Dec 2012
by Mike Walters
This example code is in the public domain.
http://www.arduino.cc/en/Tutorial/Debounce
*/
// constants won't change. They're used here to
// set pin numbers:
const
int buttonPin
=
2;
// the number of the pushbutton pin
const
int ledPin
=
13;
// the number of the LED pin
// Variables will change:
int ledState
=
HIGH;
// the current state of the output pin
int buttonState
;
// the current reading from the input pin
int lastButtonState
=
LOW;
// the previous reading from the input pin
// the following variables are long's because
the time, measured in miliseconds,
// will quickly become a bigger number than can
be stored in an int.
long lastDebounceTime
= 0;
// the last time the output pin was toggled
long debounceDelay
=
50;
// the debounce time; increase if the output flickers
void setup()
{
pinMode(buttonPin
,
INPUT);
pinMode(ledPin
,
OUTPUT);
// set initial LED state
digitalWrite(ledPin
,
ledState
);
}
void loop()
{
// read the state of the switch into a local variable:
int reading
=
digitalRead(buttonPin
);
// check to see if you just pressed the button
// (i.e. the input went from LOW to HIGH), and you've
waited
// long enough since the last press to ignore any noise:
// If the switch changed, due to noise or pressing:
if (reading
!= lastButtonState
)
{
// reset the debouncing timer
lastDebounceTime
=
millis();
}
if ((millis()
- lastDebounceTime
)
> debounceDelay
)
{
// whatever the reading is at, it's been there
for longer
// than the debounce delay, so take it as the
actual current state:
// if the button state has changed:
if (reading
!= buttonState
)
{
buttonState
= reading
;
// only toggle the LED if the new
button state is HIGH
if (buttonState
== HIGH)
{
ledState
=
!ledState
;
}
}
}
// set the LED:
digitalWrite(ledPin
,
ledState
);
// save the reading. Next time through the loop,
// it'll be the lastButtonState:
lastButtonState
= reading
;
}
به لینک های زیر مراجعه کنید: