آموزش مثال ها | اطلاعات پایه | فوت و فن | پیوندها
Examples > Digital I/O
Blink Without Delay
گاهی نیاز دارید دو عمل را به صورت همزمان انجام دهید. بطور مثال ممکن است
بخواهید همزمان با خواندن یک ورودی یا فشار یک دکمه، LED را چشمک زن کنید (یا یک عمل
حساس به زمان دیگر). در این حالت نمی توانید از delay()
استفاده کنید، یا سایر عملیات ها را در برنامه، تا زمانی که یک LED چشمک می زند،
متوقف کنید. اگر در جریان delay()، دکمه ای فشرده شود،
برنامه ممکن است فشرده شدن دکمه را نبیند و از دست بدهد. این اسکچ نشان می دهد که چطور یک
LED بدون دستور delay() چشمک می زند. این برنامه، آخرین
عملی که آردوینو روی LED انجام داده است را نگه می دارد. سپس هر بار در حلقه
loop()، چک می شود که آیا زمان دلخواه ما را طی کرده
است یا نه؟ اگر چنین بود، LED را به حالت مخالف وضعیت فعلی در می آورد.
سخت افزار مورد نیاز
- برد آردوینو
- یک LED
مدار
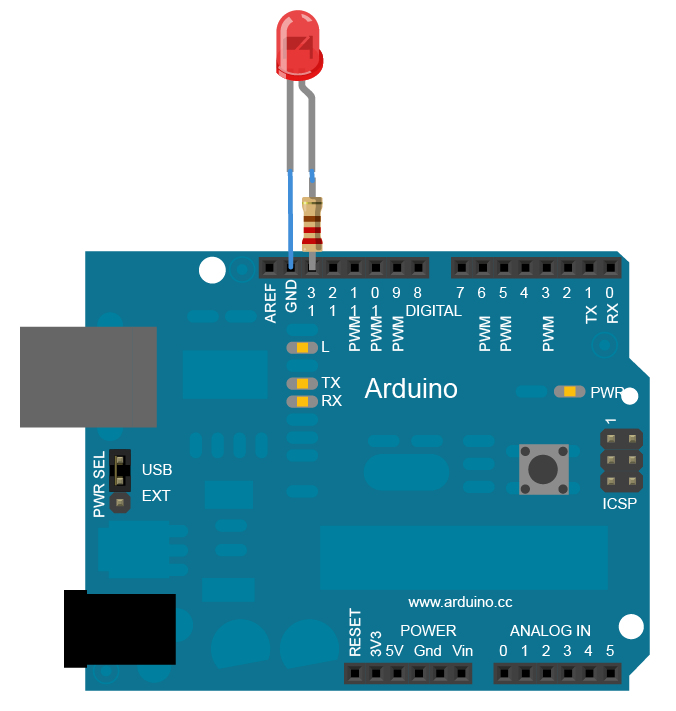
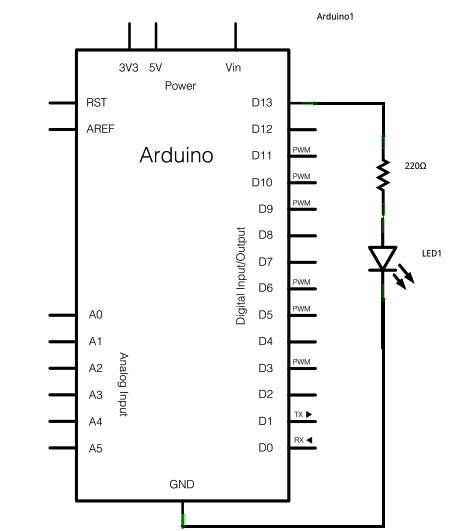
برای ساخت مدار، یک LED بردارید و پایه بلند آن یعنی پایه مثبت(که آنود نامیده می شود) را به پین 13 و پایه کوتاه یعنی پایه منفی(که کاتود نامیده می شود) را به زمین وصل کنید. بعد برد آردوینو را به کامپیوتر متصل کرده، برنامه آردوینو را اجرا و کد زیر را وارد کنید.
شماتیک
برای بزرگ شدن تصویر روی آن کلیک کنید.
این تصویر با استفاده از نرم افرار Fritzingایجاد شده است. برای مثال های بیشتر مدار به صفحه پروژه های Fritzing مراجعه نمایید.
کد
کد زیر از تابع
millis() استفاده می کند، دستوری که تعداد
میلی ثانیه را از زمانی که برد آردوینو برنامه فعلی را برای چشمک زدن LED اجرا می کند،
بر می گرداند.
Turns on and off a light emitting diode(LED) connected to a digital
pin, without using the delay() function. This means that other code
can run at the same time without being interrupted by the LED code.
The circuit:
* LED attached from pin 13 to ground.
* Note: on most Arduinos, there is already an LED on the board
that's attached to pin 13, so no hardware is needed for this example.
created 2005
by David A. Mellis
modified 8 Feb 2010
by Paul Stoffregen
This example code is in the public domain.
http://www.arduino.ir/Tutorial/BlinkWithoutDelay
*/
// constants won't change. Used here to
// set pin numbers:
const int ledPin = 13; // the number of the LED pin
// Variables will change:
int ledState = LOW; // ledState used to set the LED
long previousMillis = 0; // will store last time LED was updated
// the follow variables is a long because the time, measured in miliseconds,
// will quickly become a bigger number than can be stored in an int.
long interval = 1000; // interval at which to blink (milliseconds)
void setup() {
// set the digital pin as output:
pinMode(ledPin, OUTPUT);
}
void loop()
{
// here is where you'd put code that needs to be running all the time.
// check to see if it's time to blink the LED; that is, if the
// difference between the current time and last time you blinked
// the LED is bigger than the interval at which you want to
// blink the LED.
unsigned long currentMillis = millis();
if(currentMillis - previousMillis > interval) {
// save the last time you blinked the LED
previousMillis = currentMillis;
// if the LED is off turn it on and vice-versa:
if (ledState == LOW)
ledState = HIGH;
else
ledState = LOW;
// set the LED with the ledState of the variable:
digitalWrite(ledPin, ledState);
}
}
به لینک های زیر مراجعه کنید:
- setup()
- loop()
- millis()
- BareMinimum - حداقل کدی که جهت آغاز یک برنامه آردوینو مورد نیاز است.
- Blink -یک LED را روشن و خاموش کنید.
- DigitalReadSerial -یک سوییچ را خوانده و وضعیت آن را به عنوان خروجی، در محیط Serial Monitor نرم افزار آردوینو چاپ کنید.

