آموزش مثال ها | اطلاعات پایه | فوت وفن ها | پیوندها
Examples > Digital I/O
تشخیص تغییر وضعیت کلید (تشخیص لبه)
زمانی که با یک
کلید فشاری کار می کنید، اغلب احتیاج دارید که برخی عملیات ها را بر اساس این که کلید چند بار فشرده شده است، انجام دهید. جهت انجام این کار، لازم است بدانید وضعیت کلید چه زمانی از حالت off به حالت on تغییر کرده است، و تعداد دفعاتی که این تغییر وضعیت اتفاق افتاده است را بشمارید. این عمل را تشخیص تغییر وضعیت یا تشخیص لبه می نامیم.سخت افزار مورد نیاز
- برد آردوینو
- سوییچ یا کلید دو وضعیتی
- مقاومت 10 کیلو اهمی
- بردبورد
- سیم بردبوردی
مدار

این تصویر با استفاده از نرم افزار Fritzing ایجاد شده است. برای مثال های بیشتر مدار به صفحه پروژه های Fritzing مراجعه نمایید.
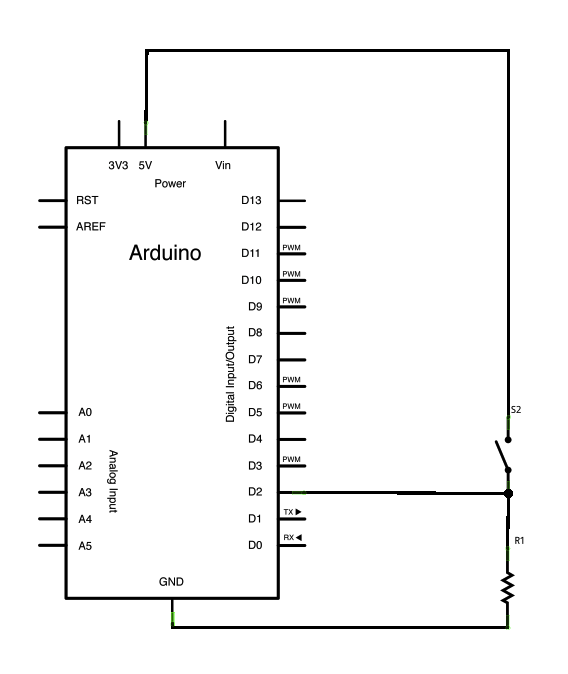
سه عدد سیم را به برد آردوینو متصل کنید. نخستین سیم توسط یک مقاومت pull-down (در اینجا 10 کیلو اهمی) از یک پایه کلید فشاری، به زمین می رود. سیم دوم، به یک پین ورودی/خروجی دیجیتال (در اینجا پین 2) متصل می شود. این پین وضعیت کلید را می خواند.
زمانی که کلید فشاری باز (فشرده نشده) است، هیچ اتصالی بین دو پایه کلید فشاری وجود ندارد. بنابراین پین (از طریق یک مقاومت pull-down) به زمین متصل است. و ما آن را LOW می خوانیم. زمانی که کلید بسته (فشرده) است، اتصالی را بین دو پایه خود ایجاد می کند و پین به ولتاژ وصل می شود. بدین ترتیب ما یک ورودی HIGH را می خوانیم. (پین همچنان به زمین متصل است، اما مقاومت در برابر جریان جاری مقاومت می کند، بنابراین مسیر حداقل مقاومت به سمت +5 ولت است.)
so the path of least resistance is to +5V.)اگر شما پین ورودی/خروجی دیجیتال را از همه جا قطع کنید، LED به طور بی نظم چشمک می زند. این رویداد به این دلیل است که ورودی شناور است - به این معنی که به ولتاژ یا زمین وصل نیست. این پین به طور تصادفی HIGH یا LOW را بر می گرداند. به همین دلیل است که شما به یک مقاومت pull-dwn در مدار نیاز دارید.
شماتیک
برای بزرگ شدن تصویر روی آن کلیک کنید.
اسکچ زیر، به طور پیوسته وضعیت کلید را می خواند. سپس وضعیت کلید را با وضعیتش در آخرین زمان در تابع Loop برنامه مقایسه می کند. اگر وضعیت کنونی کلید با آخرین وضعیت آن متفاوت بود و وضعیت کنونی کلید HIGH بود، کلید از وضعیت خاموش به وضعیت روشن در می آید. سپس اسکچ شمارنده کلید فشاری (buttonPushCounter) را افزایش می دهد.
به علاوه، اسکچ مقدار شمارنده را چک می کند، و اگر مقدار آن یکی از مضارب عدد چهار بود، LED متصل به پین 13 را روشن می کند. در غیر این صورت، آن را خاموش می نماید.
کد
State change detection (edge detection)
Often, you don't need to know the state of a digital input all the time,
but you just need to know when the input changes from one state to another.
For example, you want to know when a button goes from OFF to ON. This is called
state change detection, or edge detection.
This example shows how to detect when a button or button changes from off to on
and on to off.
The circuit:
* pushbutton attached to pin 2 from +5V
* 10K resistor attached to pin 2 from ground
* LED attached from pin 13 to ground (or use the built-in LED on
most Arduino boards)
created 27 Sep 2005
modified 30 Aug 2011
by Tom Igoe
This example code is in the public domain.
http://arduino.ir/Tutorial/ButtonStateChange
*/
// this constant won't change:
const int buttonPin = 2; // the pin that the pushbutton is attached to
const int ledPin = 13; // the pin that the LED is attached to
// Variables will change:
int buttonPushCounter = 0; // counter for the number of button presses
int buttonState = 0; // current state of the button
int lastButtonState = 0; // previous state of the button
void setup() {
// initialize the button pin as a input:
pinMode(buttonPin, INPUT);
// initialize the LED as an output:
pinMode(ledPin, OUTPUT);
// initialize serial communication:
Serial.begin(9600);
}
void loop() {
// read the pushbutton input pin:
buttonState = digitalRead(buttonPin);
// compare the buttonState to its previous state
if (buttonState != lastButtonState) {
// if the state has changed, increment the counter
if (buttonState == HIGH) {
// if the current state is HIGH then the button
// wend from off to on:
buttonPushCounter++;
Serial.println("on");
Serial.print("number of button pushes: ");
Serial.println(buttonPushCounter);
}
else {
// if the current state is LOW then the button
// wend from on to off:
Serial.println("off");
}
}
// save the current state as the last state,
//for next time through the loop
lastButtonState = buttonState;
// turns on the LED every four button pushes by
// checking the modulo of the button push counter.
// the modulo function gives you the remainder of
// the division of two numbers:
if (buttonPushCounter % 4 == 0) {
digitalWrite(ledPin, HIGH);
} else {
digitalWrite(ledPin, LOW);
}
}
به لینک های زیر مراجعه کنید:
- pinMode()
- digitalWrite()
- digitalRead()
- if()
- millis()
- DigitalReadSerial - یک سوییچ را خوانده و وضعیت آن را به عنوان خروجی، در محیط Serial Monitor نرم افزار آردوینو چاپ کنید.
- BlinkWithoutDelay - چشمک زدن یک چراغ بدون استفاده از تابع delay() .
- Blink - یک LED را روشن و خاموش کنید.
